Blog

  • burmese_digit_recognizer_with_nn

    Burmese Handwritten Digit Recognizer

    Burmese Digit Recognizer using one-hidden layer Neural Network based on BHDD Burmese Handwritten Digit Dataset.

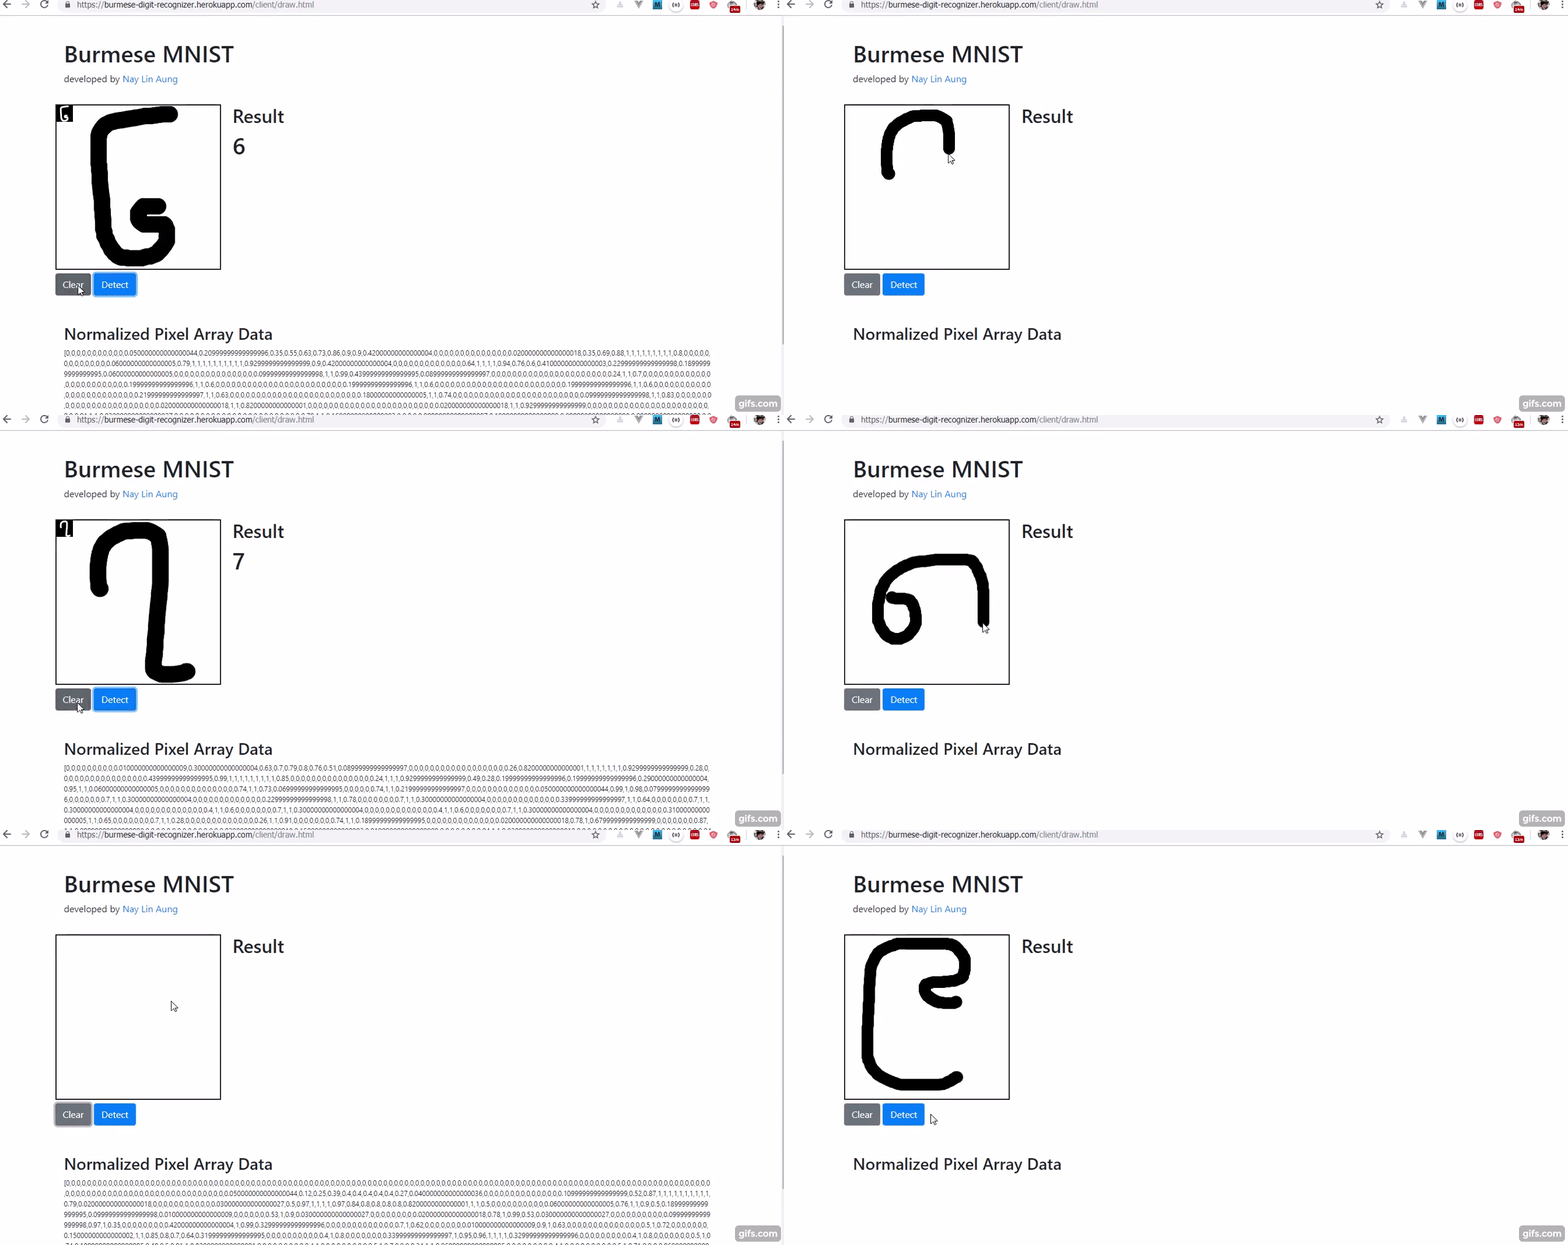
    Demo

    Machine Learning နည်းပညာကို အသုံးပြုပြီး develop လုပ်ထားတဲ့ Burmese Handwritten Digit Recognizer လေးပါ။ Synaptic.js ကို အသုံးပြုပြီး one-hidden layer Neural Network တည်ဆောက်ပြီး ရေးသားထားတာပါ။ Dataset အနေနဲ့ BHDD dataset ကို အသုံးပြုထားပါတယ်။

    Demo

    Project ရဲ့ trained_models folder ထဲမှာ train ပြီးသား model ကို json file format နဲ့ သိမ်းပေးထားပါတယ်။ Node.js နဲ့ စမ်းခြင်တယ်ဆိုရင် model file ကို fs နဲ့ read လုပ်ပြီး စမ်းကြည့်လို့ ရပါတယ်။ Sample အနေနဲ့ Predict.js ဆိုပြီး ရေးပေးထားတာ ရှိပါတယ်။

    ဒါပေ့သိ burmese digit အတွက် Predict ကတော့ Burmese Handwritten Digit Json Dataset ကို မထည့်ပေးလိုက်တဲ့အတွက် စမ်းလို့ ရမှာ မဟုတ်ပါဘူး။ ကိုယ်တိုင် Json Dataset ပြန်ထုတ်နိုင်ဖို့ Data Pre-processing အပိုင်းကို လေ့လာပြီး လုပ်ကြည့်လို့ရပါတယ်။

    အကယ်လို့ browser ထဲမှာ canvas နဲ့ ရေးပြီး စမ်းကြည့်ခြင်ရင်တော့ client folder ထဲမှာ burmese_digit_draw.html နဲ့ english_digit_draw.html ဆိုပြီး ရေးပေးထားပါတယ်။

    သက်ဆိုင်ရာ file ကို browser တွင် တိုက်ရိုက်ဖွင့်ပြီး စမ်းကြည့်လို့ ရပါတယ်။

    သတိထားစရာ နှစ်ချက်ရှိပါတယ်။

    • ပထမအချက်က ဂဏန်း ၁ လုံးဘဲ ရေးလို့ ရပါသေးတယ်။ ၁ ဆို ၁၊ ၂ ဆို ၂ တလုံးတည်းပါ။
    • နောက်တစ်ခုက စမ်းတဲ့အခါ canvas ရဲ့ အလယ်တည့်တည့်မှာ ဂဏန်းကို ခပ်ကြီးကြီးနဲ့ အပြည့်ရေးပေးဖို့ လိုပါတယ်။

    တကယ် train ကြည့်တော့ ရလာတဲ့ model က test data နဲ့တော့ အကုန်နီးပါးမှန်ပြီး error rate အတော်လေးနည်းတယ် ဆိုပေမယ့် တကယ်တမ်း canvas ပေါ်မှာ ရေးပြီး စမ်းကြည့်တဲ့အခါ အဆင်မပြေတာလေးတွေတွေ့လာရပါတယ်။ အဓိကပြဿနာက canvas ပေါ်က image pre-processing လုပ်တာ လိုအပ်ချက်ရှိနေသေးတာကြောင့်လို့ ထင်ပါတယ်။

    Training Process Overview

    Choice of Programming Language

    အဓိက Programming language အနေနဲ့ကတော့ Javascript ကိုဘဲ ရွေးချယ်ခဲ့ပါတယ်။ ကိုယ်က web developer ဖြစ်တဲ့အလျောက် ကိုယ်နဲ့ရင်းနှီးတဲ့ language တစ်ခုကို ရွေးလိုက်တဲ့ သဘောပါဘဲ။

    Javascript ထဲကမှ ကျွန်တော် အတော်လေးသဘောကျတဲ့ Synaptic.js ဆိုတဲ့ library လေးကို ရွေးချယ်ခဲ့ပါတယ်။ ။ ပြီးပြည့်စုံတဲ့ tensorflow.js လိုမျိုး ရှိရက်သားနဲ့ ဘာကြောင့် အဲဒီ library ကို ရွေးခဲ့တာလဲပေါ့။

    Synaptic.js က တကယ့်ကို tiny library လေးပါ။ code files စုစုပေါင်း 12 ခုဘဲ ပါပါတယ်။ Pre-defined architectures တွေဖယ်လိုက်ရင် 8 files ဘဲ ကျန်ပါတော့တယ်။ အဲဒီထဲကမှ အကြီးဆုံး file က code line ပေါင်း ၆၀၀ လောက်ဘဲ ရှိတာပါ။

    အဲ့တော့ source code တွေက အတော်လေး accessible , readable ဖြစ်ပါတယ်။ သူနောက်ကွယ်မှာ ဘယ်လိုရေးထားလဲဆိုတာ သိဖို့ source code တွေကို ဝင်ဖတ်လို့ရတာဟာ လေ့လာနေဆဲသူတွေအတွက် အတော်လေး တာသွားစေတဲ့အချက်ပါ။

    “library က method တစ်ခုကို လှမ်းခေါ်လိုက်တာ မည့်သို့မည်ပုံ ဖြစ်သွားသည်မသိ၊ အလိုလို အကုန်ဖြစ်သွားတယ်”

    ဆိုတာမျိုး မကြုံရတော့ဘူးပေါ့။

    Data Pre-processing

    ဒါက ML လုပ်တဲ့သူတိုင်း မဖြစ်မနေလုပ်ရတဲ့ အဆင့်တစ်ခုပါဘဲ။ BHDD မူရင်းကတော့ Dataset ကို python pickle file လေးနဲ့ distribute လုပ်ပေးထားတာ တွေ့ရတယ်။ ဒါမယ့် ကိုယ်ကတော့ အဲ့ဒါကို Yann Lecun ရဲ့ English MNIST format အတိုင်း idx format ကို ပြန်ပြောင်းလိုက်ပါတယ်။ Byte arragement တွေကအစ အားလုံးအတူတူဖြစ်အောင် ပြင်လိုက်ပါတယ်။ အခြား Language တွေရဲ့ Dataset loader အားလုံးနီးပါးက idx format ရဲ့ byte arrangement အတိုင်း data ဖတ်ကြတာဆိုတော့ နောက်စမ်းမယ့်သူတွေလည်း အဆင်ပြေသွားအောင်လို့ပါ။

    ပြီးနောက်မှာ Synaptic.js အတွက် သီးသန့် Json format ကို MNIST_DL script သုံးပြီး ပြန်ပြောင်းလိုက်ပါတယ်။

    (idx format ပြောင်းပြီးသား dataset ကိုရော၊ Json format နဲ့ dataset ကိုရော ကျွန်တော် repo ထဲမှာ မထည့်ထားပါဘူး။ format ပြောင်းဖို့ ရေးထားတဲ့ python script ကိုတော့ ထည့်ပေးလိုက်ပါတယ်။ အဓိက Dataset ကို တဆင့်ပြန်ဖြန့်သလို ဖြစ်သွားမှာ စိုးရိမ်လို့ပါ။)

    Model Training

    Network ကတော့ 100 neurons ပါတဲ့ one-hidden layer နဲ့ဘဲ ဆောက်လိုက်ပါတယ်။ 200 neurons နဲ့ တည်ဆောက်ကြည့်သေးပေမယ့် တကယ် train ကြည့်တဲ့အခါ ထင်သလောက် ရလဒ်မကောင်းဘဲ learning rate က iteration တစ်ခုနဲ့တစ်ခုကြား လိုတာထက်ပိုပြီး အရမ်းကြာနေတာကို တွေ့ရပါတယ်။ Activation function ကတော့ Logistic (Sigmoid) သုံးထားပါတယ်။ Output layer အတွက်တော့ Softmax activation ကို library မှာ မပါလာလို့ ကိုယ်ဘာကိုဘဲ ဖြည့်ရေးလိုက်ပါတယ်။ Loss function ကတော့ အားလုံးသိပြီးသား Cross entropy ဘဲ သုံးထားပါတယ်။

    Training algorithm ကတော့ Synaptic.js ရဲ့ ကျောရိုးအနေနဲ့ ပါလာတဲ့ Google developer Derek Monner ရဲ့ LSTM ကို အခြေခံထားတဲ့ architecture free LSTM-g ဆိုတဲ့ algorithm ကိုဘဲ အသုံးပြုလိုက်ပါတယ်။

    နောက်ဆုံးအဆင့် train တာကိုတော့ AWS EC2 ကို c4.8xlarge type နဲ့ instance တစ်ခုဆောက်ပြီး run ပါတယ်။ Node server နဲ့ဘဲ train တာပါ။ Instance ဖိုးတော့ USD 25 လောက် ကုန်ကျမှု ရှိပါတယ်။

    Training data 40000 နဲ့ iteration ပေါင်း ၃၀၀ အကျော်လောက် train အပြီးမှာတော့ error rate 0.01 လောက်ရလာလို့ train တာ break လိုက်ပါတယ်။

    Input Data Pre-processing (Canvas Image Pre-processing)

    ဒါကတော့ အပျော်ရဆုံး အပိုင်းပါဘဲ (Pun intended) ။ ဒီအကြောင်း အသေးစိတ်ရေးမယ်ဆိုရင် article တစ်ပုဒ်စာ ထွက်သွားနိုင်ပါတယ်။

    Web development လုပ်တာကြာပြီဆိုပေမယ့် html5 canvas ကိုတော့ တခါမှ မစမ်းဖူးတာ အမှန်ပါ။ ခုကျတော့ Canvas ပေါ်မှာ ဆွဲလိုက်တဲ့ Digit ကို model ထဲ ထည့်ပြီး classify လုပ်ရမှာဆိုတော့ Canvas အကြောင်း အသေးစိတ် သိဖို့က လိုလာတယ်။

    ပထမဆုံး scaling လုပ်ရပါတယ်။ Canvas က ပေးထားတာ 280 x 280 ဆိုပေမယ့် trained image size 28 x 28 ကို ပြန်ချုံရပါတယ်။

    နောက်တစ်ခုအနေနဲ့ MNIST dataset ထဲက image တွေက 20 pixles ထဲမှာဘဲ digit ကို ဝင်အောင်ဆွဲထားပြီး 4 pixels ကို all-around corners အနေနဲ့ထား ထားပါတယ်။ အဲ့အတွက် center image scaling ထပ်လုပ်ရပါတယ်။ နောက်မှာတော့ pixels point တွေကို 0 to 1 range အကြားရဖို့ normalize ပြန်လုပ်ရပါတယ်။ အဲ့အတွက် grayscale image တစ်ခုအဖြစ် အရင်ပြန်ပြောင်းရပြန်တယ်။

    ကံကောင်းထောက်မစွာ online က code reference လေးတစ်ခုရခဲ့ပြီး ကိုယ့်လိုအပ်ချက်အတိုင်း အသေးစိတ် လိုက်ပြင်ပြီးတဲ့ နောက်မှာတော့ အဆင်ပြေတဲ့ Canvas Input နဲ့ Image pixel array data လေး ရလာပါတယ်။

    အဲ့မှာ တစ်ခုတွေ့တာက English MNIST dataset နဲ့ train ထားတဲ့ model မှာတော့ image တွေကို scaling လုပ်ပြီးမှသာ မှန်အောင် predict လုပ်ပေးနိုင်ပါတယ်။ BHDD မှာတော့ canvas က image တွေကို 4 pixels corners scaling လုပ်လိုက်ရင် prediction က အနည်းငယ်အမှားများတာ တွေ့ရပါတယ်။ ဒါကြောင့် Burmese version မှာတော့ corner scaling ကို 1 pixel ဘဲထား ထားပါတယ်။

    ဒါက ကျွန်တော့် တနေရာရာမှာ လိုအပ်ချက်ရှိသွားလို့လည်း ဖြစ်နိုင်ပါတယ်။

    Conclusion

    နောက်ဆုံးအနေနဲ့ Canvas လေးနဲ့ မြန်မာဂဏန်းအက္ခရာတွေကို ရေးသားနိုင်ပြီး ဘယ်နံပါတ်လဲဆိုတာ (မမှန်တမှန်။ အဓိက canvas image proprocessing ကြောင့်ပါ ) ခန့်မှန်းပေးနိုင်တဲ့ Recognizer လေးတစ်ခု ရလာပါပြီ။

    အလောတကြီး အားတဲ့အချိန်လေးမှာ ရေးထားရတာဆိုတော့ နောက်ကွယ်က js code က သပ်ရပ်မှုအား နည်းပါသေးတယ်။

    နောက်ထပ် network အသွင်ကွဲ ပုံစံမျိုးတွေနဲ့ စမ်းပြီး ရလာတဲ့ result တွေကိုလည်း တတ်နိုင်သလောက် ဒီ repo မှာဘဲ ဆက်လက် တင်ပေးသွားပါဦးမယ်

    Improvments

    • Canvas on mobile browsers (done)
    • Responsive Canvas
    • Image pre-processing on canvas
    • Train data with CNN

    Contributors

    Credit

    Visit original content creator repository https://github.com/stevenay/burmese_digit_recognizer_with_nn
  • imagefanreloaded

    imagefanreloaded

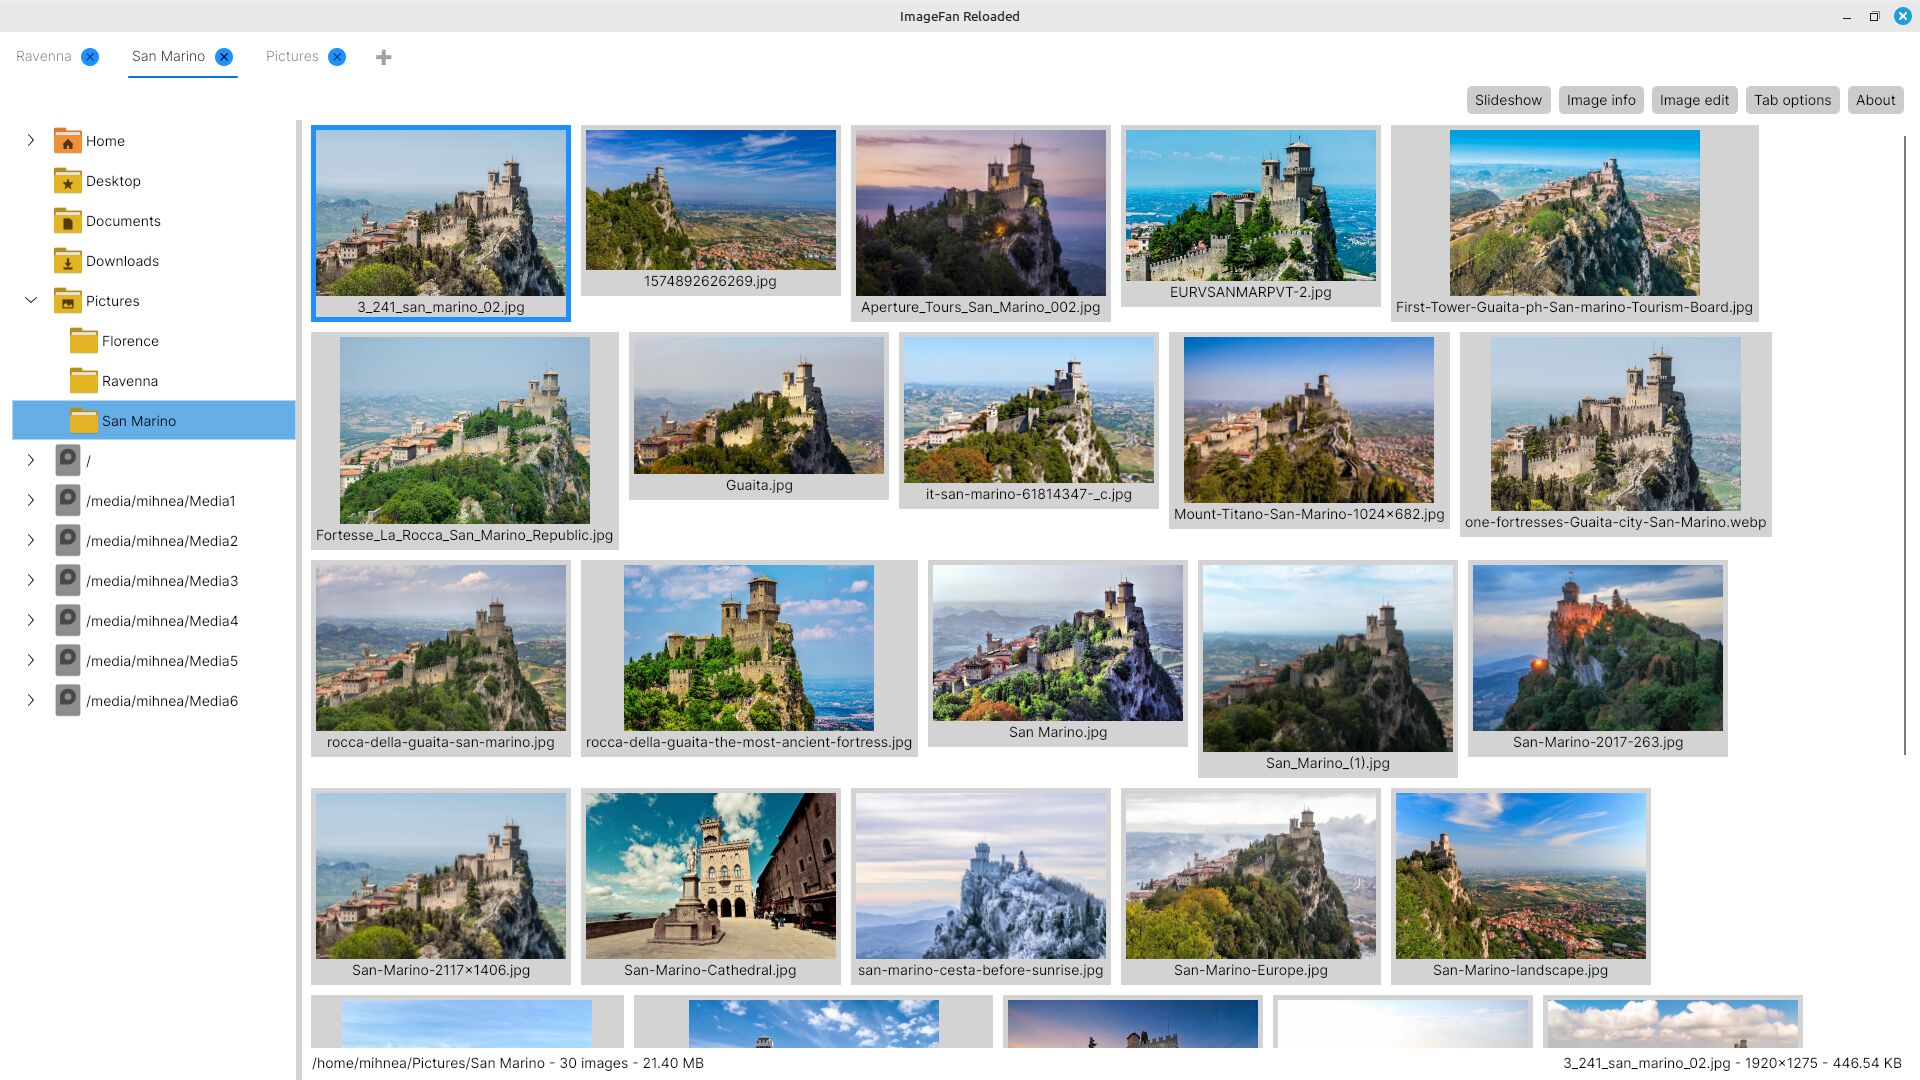
    ImageFan Reloaded is a cross-platform, feature-rich, tab-based image viewer, supporting multi-core processing.

    It is written in C#, and targets .NET 8 on Linux and Windows. It relies on Avalonia, as its UI framework, and on Magick.NET, as its image manipulation library.

    Features:

    • quick concurrent thumbnail generation, scaling to the number of processor cores present
    • support for multiple folder tabs
    • keyboard and mouse user interaction
    • 44 supported image formats: bmp, cr2, cur, dds, dng, exr, fts, gif, hdr, heic, heif, ico, jfif, jp2, jpe/jpeg/jpg, jps, mng, nef, nrw, orf, pam, pbm, pcd, pcx, pef, pes, pfm, pgm, picon, pict, png, ppm, psd, qoi, raf, rw2, sgi, svg, tga, tif/tiff, wbmp, webp, xbm, xpm
    • full-screen and windowed image viewing modes
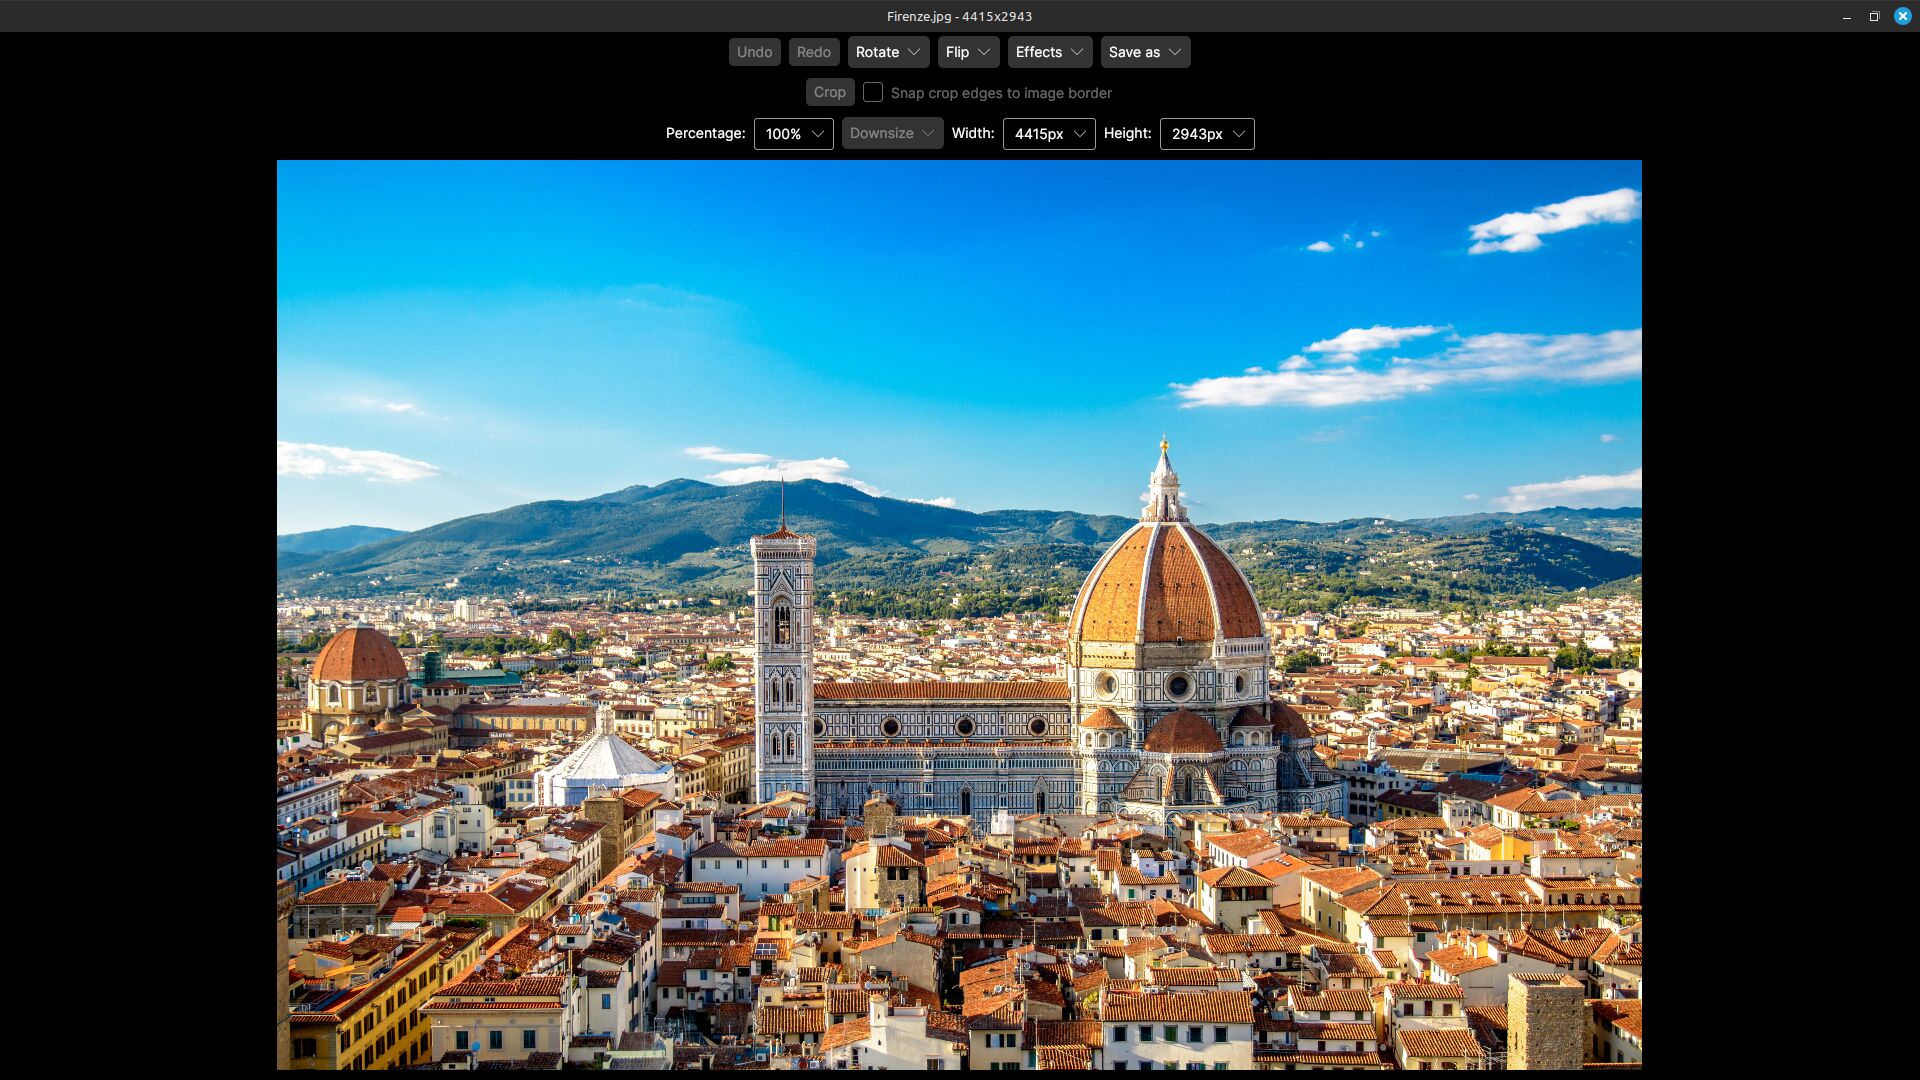
    • image editing capabilities, with undo support: rotate, flip, effects, save in various formats, crop and downsize
    • image animation support for the formats gif, mng and webp
    • folder and image file ordering by name and last modification time, ascending and descending
    • configurable thumbnail size, between 100 and 1200 pixels
    • slideshow navigation across images
    • image info containing file, image, color, EXIF, IPTC and XMP profiles
    • automatic image orientation according to the EXIF Orientation tag
    • toggle-able recursive folder browsing
    • targeted zooming in, and moving over the zoomed image
    • fast and seamless full-screen navigation across images
    • command-line direct access to the specified folder or image file

    User interface:

    • left mouse button for interacting with tabs and folders, and for selecting, opening, zooming in and out, and dragging images
    • right mouse button for displaying image info, and for returning from the opened image to the main view
    • mouse wheel for scrolling through folders and thumbnails, and for navigating back and forward through opened images
    • key combos Ctrl+Plus for adding a new tab, and Ctrl+Minus for closing an existing tab
    • key combo Shift+Tab for cycling through tabs
    • key Tab for cycling through controls in the active tab
    • keys N and M for changing folder ordering between name and last modification time in the main view, and for switching between normal and maximized view modes in the windowed image view
    • key combos Ctrl+N and Ctrl+M for changing image file ordering between name and last modification time
    • keys A and D for changing folder ordering direction between ascending and descending
    • key combos Ctrl+A and Ctrl+D for changing image file ordering direction between ascending and descending
    • digit keys 1, 2 and 3 for switching between full-screen, windowed and windowed maximized image view modes
    • keys + and – for changing thumbnail size by an increment of 50 pixels
    • key U to toggle showing file names under thumbnail images
    • key S for slideshow navigation
    • key T for displaying Image edit view, and for switching from command-line image file access mode to thumbnail navigation mode
    • keys in Image edit view: U for undo, I for redo, R for rotate, F for flip, E for effects, S for save as, C for crop and D for downsize
    • key F for displaying Image info view
    • key R to toggle recursive folder browsing
    • key E for applying EXIF image orientation
    • key O for displaying Tab options view
    • keys H and F1 for displaying About view
    • keys Up, Down, Left and Right for back and forward navigation through the folders tree, thumbnails and opened images
    • keys PageUp and PageDown for scrolling through thumbnails
    • key Enter for entering image view and zoomed image view modes
    • key combos Ctrl+Up, Ctrl+Down, Ctrl+Left and Ctrl+Right for dragging zoomed images
    • key I to toggle showing image info in image view and zoomed image view modes
    • key Esc for exiting image view and zoomed image view modes, and for quitting application

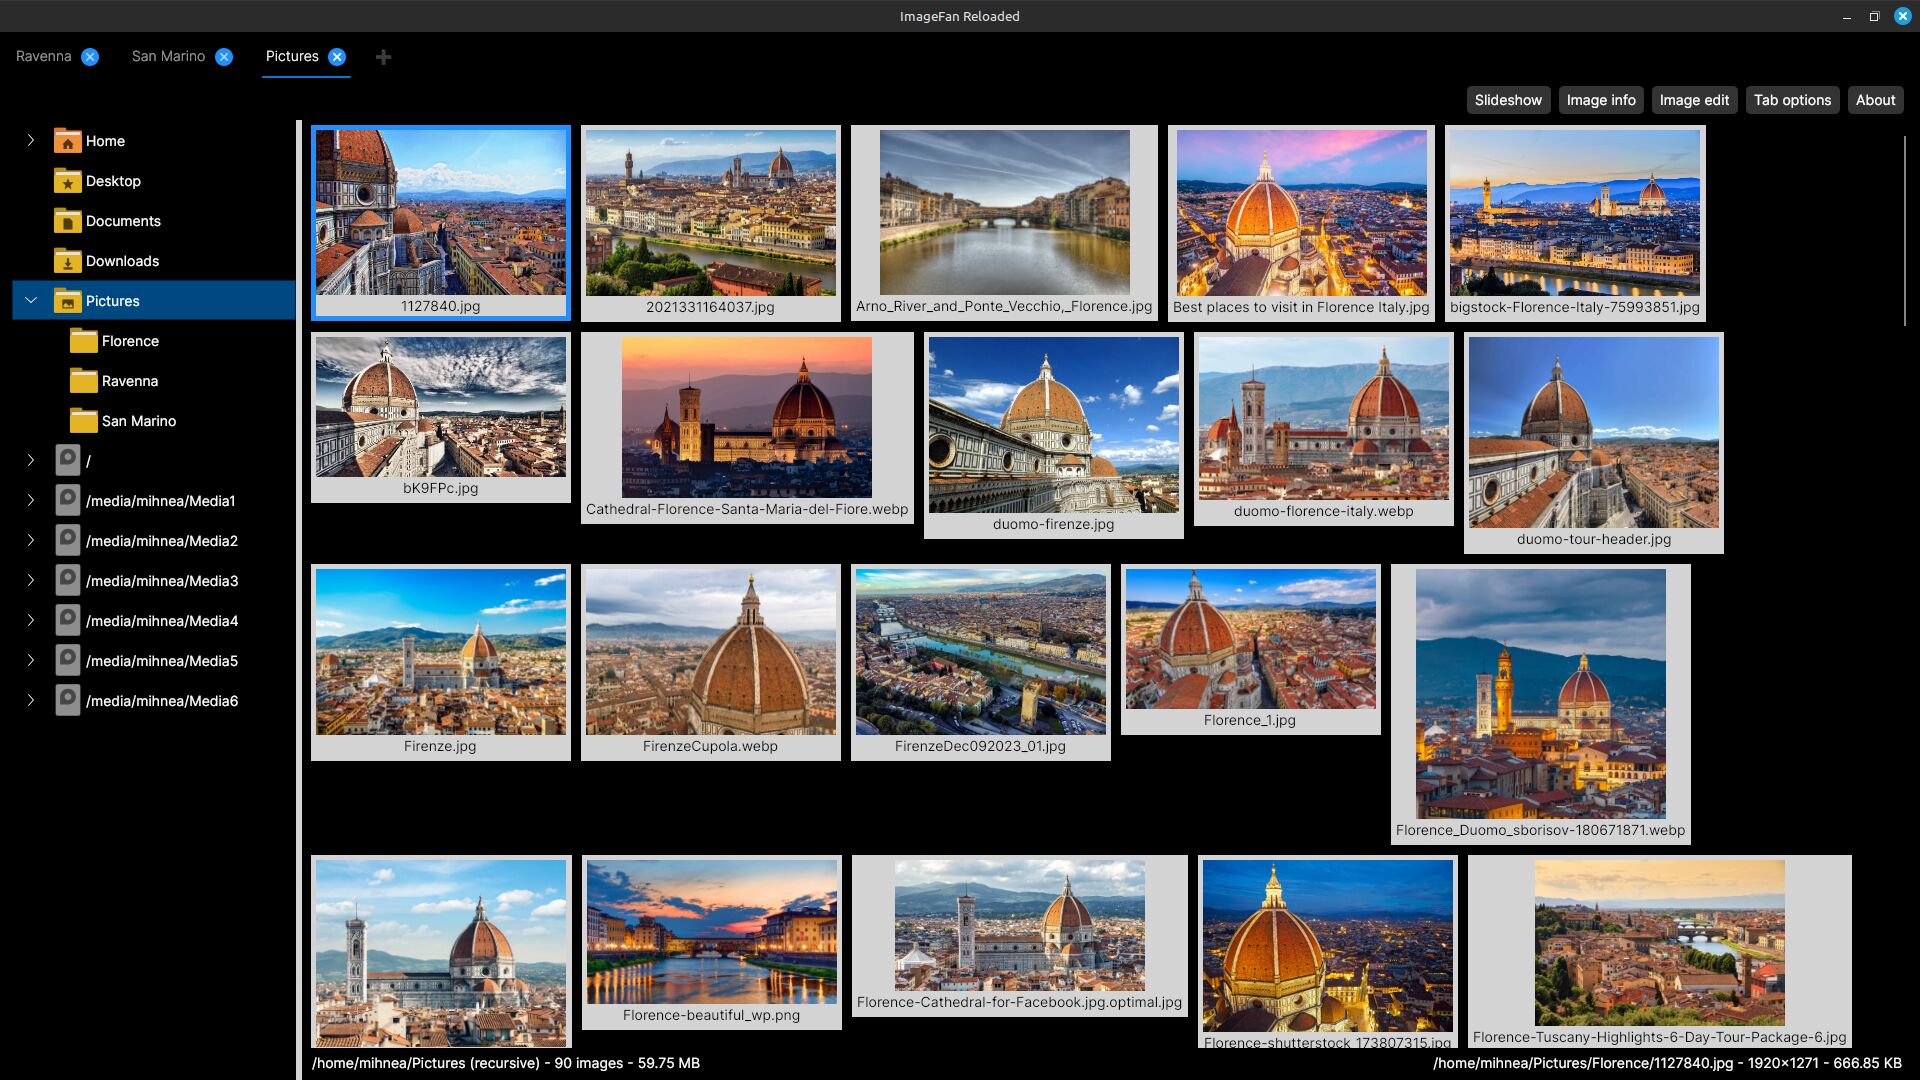
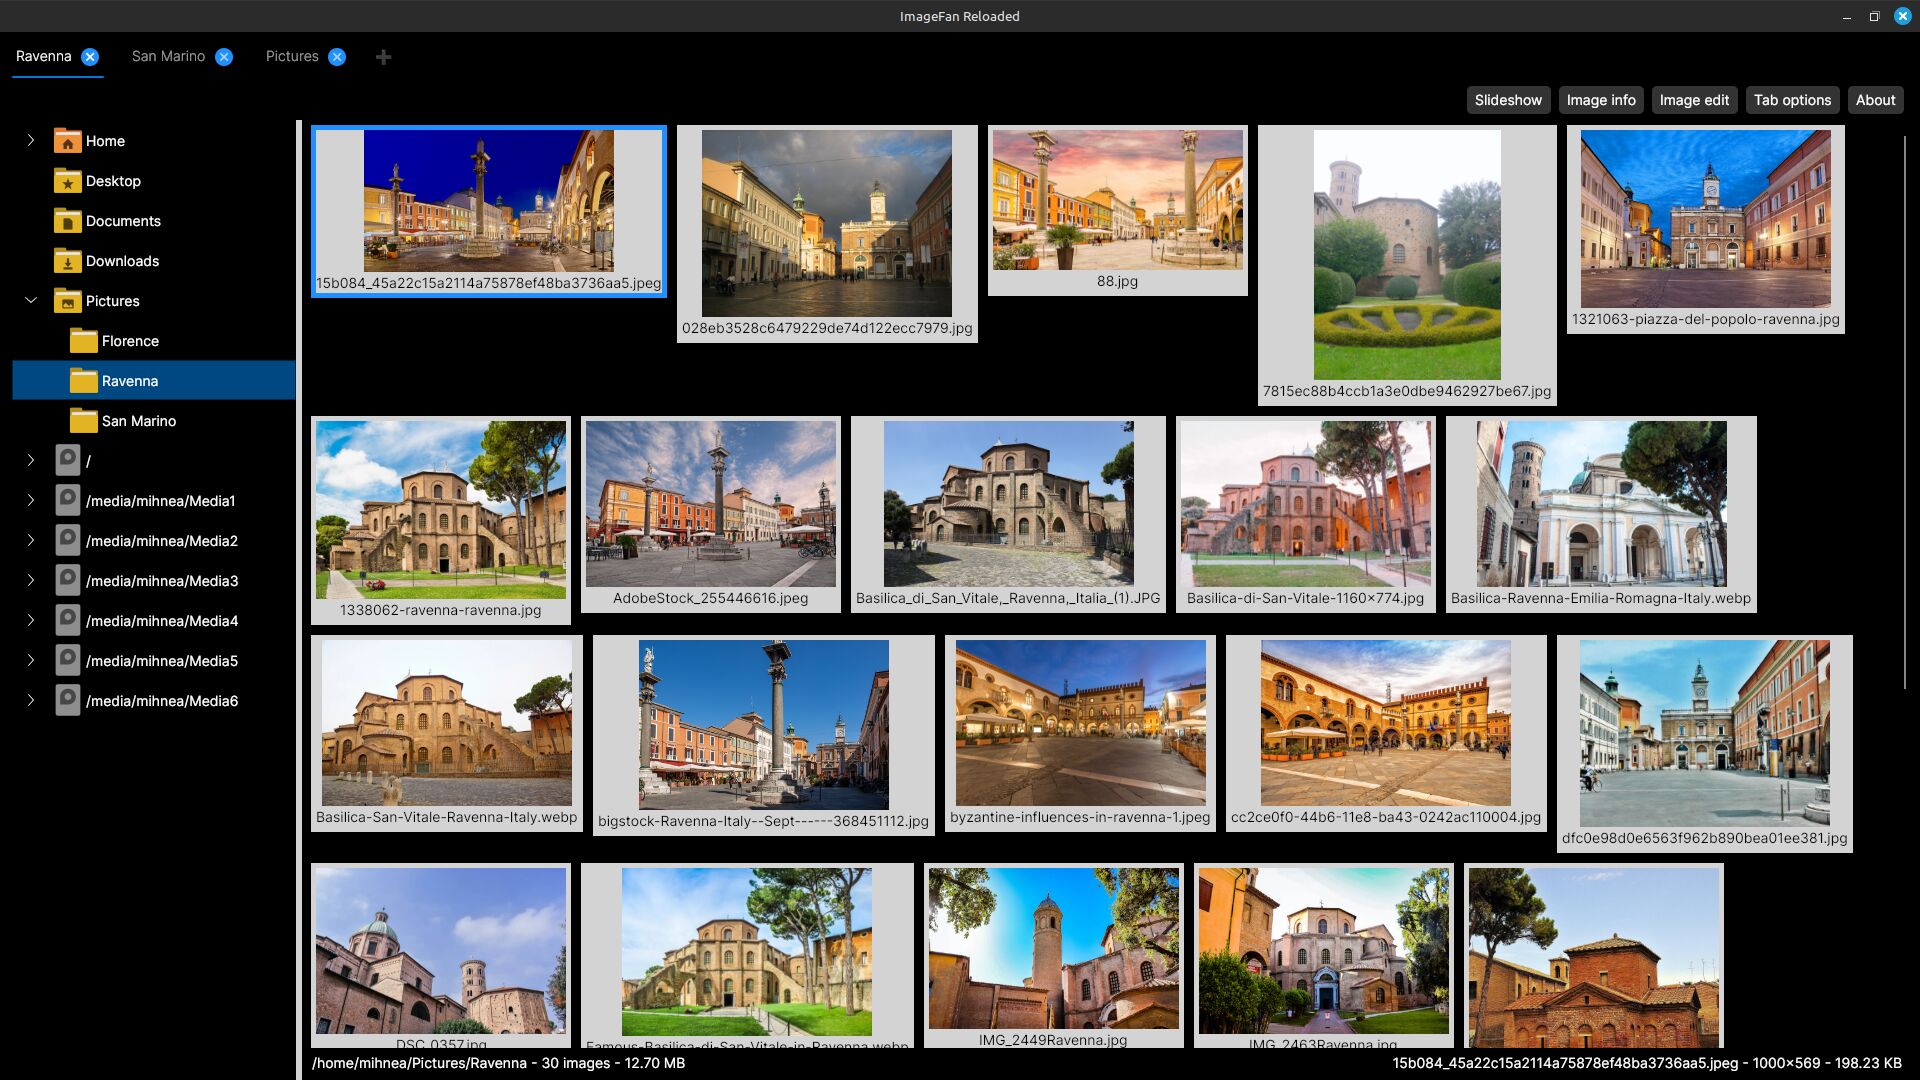
    Screenshot 1

    Screenshot 2

    Screenshot 3

    Screenshot 4

    Visit original content creator repository https://github.com/mihnea-radulescu/imagefanreloaded
  • WaveFunctionDiffusion

    WaveFunctionDiffusion

    Based on a mix of Wave Function Collapse (WFC) and Stable Diffusion (SD) algorithms, this repository generates a tile map (demonstrated with Starcraft:Remastered maps) from a simple text prompt (txt2img) or a given image (img2img).

    It uses a dreamboothed Stable Diffusion model trained with images of tile maps, and a custom VAE model (AutoencoderTile) to encode and decode the latent variables to and from tile probabilities (“waves”).

    A WFC Guidance is also added to the sampling process, which pushes the generated tile map closer to the WFC transition rules. For more information about how guidance works, check out this tutorial: Fine-Tuning, Guidance and Conditioning

    The model is trained with melee maps on all tilesets, which are downloaded from Battle.net, bounding.net (scmscx.com) and broodwarmaps.net.

    Huggingface Model: https://huggingface.co/wdcqc/starcraft-terrain-64×64

    Huggingface Spaces: https://huggingface.co/spaces/wdcqc/wfd

    Run with Colab

    Open In Colab

    Installation

    1. Install Python 3.9 (3.8 or 3.10 should also work)
    2. Install CUDA and PyTorch
    3. Install requirements with pip install -r requirements.txt
    4. (Optional) Install xformers (this is pretty complicated but it increases diffusion efficiency)

    Local demo

    Start the web UI demo:

    python demo.py

    Then open up the browser and navigate to the displayed URL to start diffusing!

    In local demo, generated maps (.scx files) are saved in the outputs folder.

    Using the 🧨diffusers pipeline

    Sample code:

    # Load pipeline
    from wfd.wf_diffusers import WaveFunctionDiffusionPipeline
    from wfd.wf_diffusers import AutoencoderTile
    from wfd.scmap import find_tile_data, get_tileset_keyword
    
    # Tilesets: ashworld, badlands, desert, ice, jungle, platform, twilight, install
    tileset = "ice"
    
    # The data files are located in wfd/scmap/tile_data/wfc
    wfc_data_path = find_tile_data("wfc/{}_64x64.npz".format(tileset))
    
    # Use CUDA (otherwise it will take 15 minutes)
    device = "cuda"
    
    tilenet = AutoencoderTile.from_pretrained(
        "wdcqc/starcraft-terrain-64x64",
        subfolder="tile_vae_{}".format(tileset)
    ).to(device)
    pipeline = WaveFunctionDiffusionPipeline.from_pretrained(
        "wdcqc/starcraft-terrain-64x64",
        tile_vae = tilenet,
        wfc_data_path = wfc_data_path
    )
    pipeline.to(device)
    
    # Double speed (only works for CUDA)
    pipeline.set_precision("half")
    
    # Generate pipeline output
    # need to include the dreambooth keywords "isometric starcraft {tileset_keyword} terrain"
    tileset_keyword = get_tileset_keyword(tileset)
    pipeline_output = pipeline(
        "lost temple, isometric starcraft {} terrain".format(tileset_keyword),
        num_inference_steps = 50,
        guidance_scale = 3.5,
        wfc_guidance_start_step = 20,
        wfc_guidance_strength = 5,
        wfc_guidance_final_steps = 20,
        wfc_guidance_final_strength = 10,
    )
    image = pipeline_output.images[0]
    
    # Display raw generated image
    from IPython.display import display
    display(image)
    
    # Display generated image as tiles
    wave = pipeline_output.waves[0]
    tile_result = wave.argmax(axis=2)
    
    from wfd.scmap import demo_map_image
    display(demo_map_image(tile_result, wfc_data_path = wfc_data_path))
    
    # Generate map file
    from wfd.scmap import tiles_to_scx
    import random, time
    
    tiles_to_scx(
        tile_result,
        "outputs/{}_{}_{:04d}.scx".format(tileset, time.strftime("%Y%m%d_%H%M%S"), random.randint(0, 1e4)),
        wfc_data_path = wfc_data_path
    )

    Training with other tile maps

    To train with other tile maps, first check out the dataset classes in wfd/wfd/datasets.py. You should modify the dataset classes so they output samples of your own tileset and tile images.

    Starcraft has 5k+ tiles each tileset, so I did a lot of game-specific shenanigans to simplify it down. Under an easier tileset it should be fine to just randomly generate samples and convert them to images, possibly using the original WFC algorithm.

    Then:

    1. Train the Tile VAE (Check the config files, you can modify the hyperparameters there)
    python train_tile_vae.py --image_vae <path_to_stable_diffusion_vae> --config "configs/tilenet/tilenet_sc_space_32x32.json" --output "weights/tilenet" --train_config "configs/train/train_config_32x32.json" --save_dataset_wfc <path_to_save_wfc_metadata> --data_dir <path_to_training_data> --device cuda

    path_to_stable_diffusion_vae should be a downloaded vae folder on the original Stable Diffusion huggingface repository.

    path_to_save_wfc_metadata is the WFC metadata that should be plugged into the pipeline, see wfc_data_path above.

    1. Dreambooth the original runwayml/stable-diffusion-v1-5 (For the meaning of the options you can check out the diffusers dreambooth documentation)
    accelerate launch train_dreambooth.py --pretrained_model_name_or_path="runwayml/stable-diffusion-v1-5" --instance_data_dir=<path_to_training_data> --class_data_dir=<path_to_class_images> --output_dir="checkpoints" --with_prior_preservation --prior_loss_weight=1.0 --instance_prompt="an image of isometric scspace terrain" --class_prompt="an image of isometric terrain" --resolution=512 --train_batch_size=1 --gradient_accumulation_steps=2 --gradient_checkpointing --use_8bit_adam --learning_rate=5e-6 --lr_scheduler="constant" --lr_warmup_steps=0 --num_class_images=1000 --max_train_steps=10000 --checkpointing_steps 500

    Note that I added custom options like --append_map_name, --brightness_fix to the dreambooth script. Check python train_dreambooth.py --help for more information.

    Never-Asked Questions

    Q: How do I generate maps larger than 64×64?

    A: Pass in parameters width and height to the pipeline function call.

    The numbers should be 8 times the map size, e.g. width=512, height=512 gives a 64×64 map, and width=768, height=768 gives 96×96.

    If CUDA runs out of memory, install xformers and add pipeline.enable_attention_slicing() before calling the pipeline.

    pipeline.enable_vae_slicing() and pipeline.enable_sequential_cpu_offload() may help as well for reducing memory cost.

    Q: Is it necessary to train the entire VAE? Looks like the encoder can totally be skipped, only the decoding step is necessary.

    A: It’s not. The encoder is only slightly trained to guide the decoder, currently (for 64×64 models) only the decoder is fully trained.

    Q: Why take argmax of the generated wave, instead of using it as a prior distribution for WFC? It should make the result more accurate.

    A: Because it doesn’t work. It frequently generates impossible wave states, making WFC unsolvable (ㅠㅠㅠ)

    Q: Why choose Starcraft as the target, comparing to other tile-based games?

    A: It’s only because I’m more familiar with starcraft. It would also be interesting for like RPG Maker and Super Mario Maker, but I would have no idea where to get the dataset.

    Q: How is this algorithm related to quantum physics?

    A: It’s not. I named it wave function diffusion because Wave Function Collapse did it in the first place lmao

    Q: You seriously wasted over three weeks of time to create a terrain generator for a dead game???

    A: Well it’s all blizz’s fault for trashing their games, otherwise this could have been a great project

    Q: This will replace game level designing jobs and make everyone jobless!!!!🤬🤬🤬

    A: While I really don’t think this thing’d be able to do it, at this point we should probably stop doing jobs and wait for our AI overlords to overtake us all

    Q: Can this algorithm solve sudoku?

    A: You should do it yourself. It’s a game.

    Visit original content creator repository https://github.com/wdcqc/WaveFunctionDiffusion
  • stouch

    Project Stouch

    This software is used in the project which creates an interactive surface on the floor. An interactivity is realised by using Microsoft Kinect sensor.

    This software is supposed to be run on a modified version of the Android system which allows an access to USB devices from a native code.

    How to prepare the Android source code:

    This step is needed to enable injecting touch screen events on Cubiboard A10. Without this module it is not possible to emulate touch events detected by a Kinect sensor.
    To build Android it is possible to use the latest version of Ubuntu in my case the version was 14.10. Source code is taken from here Cubieboard A10 Android and unpack. We need to change two files:

    • android / device / softwinner / apollo-cubieboard / init.sun4i.rc
    • android / frameworks / base / data / etc / platform.xml

    In the init.sun4i.rc file, you need to uncomment the insmod /system/vendor/modules/sun4i-ts.ko line.

    After making all above changes, run the assembly with the following command:

    $./build.sh -p sun4i_crane -k 3.0

    To build the version of Android ICS, you need a GCC compiler version 4.6 and ‘make’ version 3.81. If the version of the compiler and ‘make’ differs from the required one, you can change it by the commands:

    • $sudo update-alternatives –install / usr / bin / gcc gcc /usr/bin/gcc-4.6 60 –slave / usr / bin / g ++ g ++ /usr/bin/g++-4.6
    • $sudo update-alternatives –install / usr / bin / gcc gcc /usr/bin/gcc-4.9 40 –slave / usr / bin / g ++ g ++ /usr/bin/g++-4.9
    • $sudo update-alternatives –config gcc
    • $sudo mv / usr / bin / make / usr / bin / make40
    • $sudo update-alternatives –install / usr / bin / make make / usr / local / bin / make 60
    • $sudo update-alternatives –install / usr / bin / make make / usr / bin / make40 40
    • $sudo update-alternatives –config make

    Then follow the instructions on the Cubieboard A10 Android page. Compilation errors may occur during the build process. Tips for fixing errors can be found in the Fix building issues section in the fix_android_firmware.readme file in the source code repository.
    To connect the board to the PC, you need to add the rules for connecting the device via USB. To achieve this do the following:

    • $sudo vim /etc/udev/rules.d/51-android.rules

    Add next line to the file:
    ´<SUBSYSTEM==”usb”, ATTRS{idVendor}==”18d1″, ATTRS{idProduct}==”0003″,MODE=”0666″>´

    • $sudo chmod a+rx /etc/udev/rules.d/51-android.rules

    • $sudo service udev restart

    • $sudo ./adb kill-server

    • $./adb devices

    • $./adb root

    Building problems

    Fix building issues
    If compilation fails due to existing links, remove them under the next folders:

    • lichee/linux-3.0/modules/wifi/bcm40181
    • lichee/linux-3.0/modules/wifi/bcm40183
    • lichee/linux-3.0/modules/wifi/usi-bcm4329

    If compilation fails due to undefined structure setrlimit, just add next line to include headers:

    #include <sys/time.h>
    #include <sys/resource.h>

    Compilation may fail because Stream.pm perl package is not installed. To fix just install it.

    Access to USB device

    On the Android platform there is no access to USB devices from a native code by default. However there a several ways to solve this problem.

    The solution with a permanent effect.

    The first step is to sign an application with system (platform) key. System signatures are located in directory /build/target/product/security.
    You can use them to sign your application with system privileges. To create a key store to sign a debug or release app use the commands below:

    openssl pkcs8 -in platform.pk8 -inform DER -outform PEM -out platform.priv.pem -nocrypt
    openssl pkcs12 -export -in platform.x509.pem -inkey platform.priv.pem -out platform.pk12 -name android
    keytool -importkeystore -destkeystore platform.jks -deststoretype pkcs12 -srckeystore platform.pk12 -srcstoretype PKCS12 -srcstorepass android -alias android

    Alternative way to temporarily fix an access to USB

    After running the following command re-connect a device to USB port:
    $./fixusb.sh

    Useful ADB commands

    To install the app

    adb push /Users/dmitry/Documents/stouch/app/build/outputs/apk/app-debug.apk /data/local/tmp/com.github.rdv0011.stouch
    adb shell pm install -r com.github.rdv0011.stouch

    To start the app

    adb shell am start -n "com.github.rdv0011.stouch/com.github.rdv0011.stouch.STouchActivity" -a android.intent.action.MAIN -c android.intent.category.LAUNCHER -D
    
    adb shell am start -n "com.stouch.rdv0011.testapp/com.stouch.rdv0011.testapp.Test" -a android.intent.action.MAIN -c android.intent.category.LAUNCHER

    Stop the app

    adb shell am force-stop com.github.rdv0011.stouch

    To uninstall the app from the system

    adb uninstall com.github.rdv0011.stouch

    To check the details of the installed package

    adb shell dumpsys package com.github.rdv0011.stouch

    To send the app to the background

    adb shell am start -n "com.stouch.rdv0011.testapp/com.stouch.rdv0011.testapp.Test" -a android.intent.action.MAIN -c android.intent.category.LAUNCHER
    adb shell dumpsys window windows | grep -E 'mFocusedApp'

    To send mouse event

    adb shell sendevent /dev/input/mice 3 0 x

    Building OpenCV with NEON support

    git clone https://github.com/opencv/opencv.git ~/
    mkdir -p ~/opencv/platforms/android/build_neon
    cd /opencv/platforms/android/build_neon
    export ANDROID_NDK=
    /Library/Android/sdk/ndk-bundle
    cmake -DANDROID_NATIVE_API_LEVEL=’android-15′ -DANDROID_ABI=”armeabi-v7a with NEON” -DCMAKE_TOOLCHAIN_FILE=../android.toolchain.cmake ../../..

    Visit original content creator repository
    https://github.com/rdv0011/stouch

  • vallox-api

    vallox-api

    npm version Actions Status JavaScript Style Guide Dependabot Status

    API for Vallox ventilation units

    Installation

    # npm
    npm install @danielbayerlein/vallox-api --save
    
    # Yarn
    yarn add @danielbayerlein/vallox-api

    Usage

    new Vallox(object{ip: string, port: int})

    Returns the client instance.

    import Vallox from '@danielbayerlein/vallox-api'
    
    const client = new Vallox({ ip: '192.168.178.33', port: 80 })

    Example

    .PROFILES

    Returns an object with the profile mapping.

    client.PROFILES

    Example

    .getProfile()

    Returns the current profile id.

    await client.getProfile()

    Example

    .fetchMetric(string)

    Returns the value of the metric key.

    await client.fetchMetric('A_CYC_FAN_SPEED')

    Example

    .fetchMetrics(array[string])

    Returns an array with the values if the metric keys.

    await client.fetchMetrics([
      'A_CYC_TEMP_EXHAUST_AIR',
      'A_CYC_TEMP_OUTDOOR_AIR'
    ])

    Example

    .setProfile(int, int)

    Sets the profile.

    // Permanently AWAY profile
    await client.setProfile(client.PROFILES.AWAY)
    
    // FIREPLACE mode for configured timeout
    await client.setProfile(client.PROFILES.FIREPLACE)
    
    // FIREPLACE mode for 30 min
    await client.setProfile(client.PROFILES.FIREPLACE, 30)

    Example

    .setValues(object{string: int})

    Sets the value for the metric key.

    await client.setValues({
      'A_CYC_HOME_SPEED_SETTING': 60
    })

    Example

    Supported units

    • ValloPlus 350 MV
    • ValloPlus 240-E MV
    • Please add your tested unit

    Credits

    Contributing

    1. Fork it
    2. Create your feature branch (git checkout -b my-new-feature)
    3. Commit your changes (git commit -am 'Add some feature')
    4. Push to the branch (git push origin my-new-feature)
    5. Create new Pull Request

    Copyright

    Copyright (c) 2019-present Daniel Bayerlein. See LICENSE for details.

    Visit original content creator repository https://github.com/danielbayerlein/vallox-api
  • kelp-cors

    kelp-cors

    Cross-Origin Resource Sharing(CORS) Middleware for Kelp Project.

    Installation

    $ npm i kelp-cors --save

    Example

    const http = require('http');
    const kelp = require('kelp');
    const cors = require('kelp-cors');
    
    const app = kelp();
    
    app.use(cors({
      allowOrigin: 'baidu.com',
      allowMethods: ['POST', 'GET'],
      allowHeaders: ['X-MY-HEADER', 'X-Y-HEADER'],
      exposeHeaders: ['X-MY-HEADER'],
      maxAge: 3600,
      allowCredentials: true,
    }));
    
    app.use((req, res) => {
      res.end("hello world");
    });
    
    http.createServer(app).listen(3000);

    Also accept function as options:

    app.use(cors(({ preflight }) => {
      console.log('preflight:', preflight);
      return { alloworigin: '*', allowcredentials: false };
    }));

    Contributing

    • Fork this Repo first
    • Clone your Repo
    • Install dependencies by $ npm install
    • Checkout a feature branch
    • Feel free to add your features
    • Make sure your features are fully tested
    • Publish your local branch, Open a pull request
    • Enjoy hacking <3

    MIT license

    Copyright (c) 2016 Lsong song940@gmail.com

    Permission is hereby granted, free of charge, to any person obtaining a copy of this software and associated documentation files (the “Software”), to deal in the Software without restriction, including without limitation the rights to use, copy, modify, merge, publish, distribute, sublicense, and/or sell copies of the Software, and to permit persons to whom the Software is furnished to do so, subject to the following conditions:

    The above copyright notice and this permission notice shall be included in all copies or substantial portions of the Software.

    THE SOFTWARE IS PROVIDED “AS IS”, WITHOUT WARRANTY OF ANY KIND, EXPRESS OR IMPLIED, INCLUDING BUT NOT LIMITED TO THE WARRANTIES OF MERCHANTABILITY, FITNESS FOR A PARTICULAR PURPOSE AND NONINFRINGEMENT. IN NO EVENT SHALL THE AUTHORS OR COPYRIGHT HOLDERS BE LIABLE FOR ANY CLAIM, DAMAGES OR OTHER LIABILITY, WHETHER IN AN ACTION OF CONTRACT, TORT OR OTHERWISE, ARISING FROM, OUT OF OR IN CONNECTION WITH THE SOFTWARE OR THE USE OR OTHER DEALINGS IN THE SOFTWARE.

    Visit original content creator repository
    https://github.com/lsongdev/kelp-cors

  • jinjava-maven-plugin

    JinJava Maven Plugin

    The JinJava Maven plugin allows you to use static Jinja template files
    in your application, During build, the template engine replaces variables in a template file with actual values,
    and produce the final processed output file.

    Available from the Central Repository

    Usage

    • The JinJava maven plugin can be used to template out any type of text files (eg .yml files,.txt. .json …) during build.
      This plugin can be used when we need to generate text files based on the different context.
      (can be used when we need to generate yml based on host)

    ansible

    To execute the ansible ping module with the host as localhost

           <plugin>
                          <groupId>io.github.gowrish9595</groupId>
                          <artifactId>jinjava-maven-plugin</artifactId>
                          <version>1.0.0-RC2</version>
                          <executions>
                              <execution>
                                  <goals>
                                      <goal>generate-files-for-templates</goal>
                                  </goals>
                              </execution>
                          </executions>
                          <configuration>
                              <j2ResourcesDirectory>${project.basedir}/src/main/resources/j2-templates/</j2ResourcesDirectory>
                              <outputDirectory>${project.basedir}/src/main/resources/</outputDirectory>
                              <contextFilePath>${project.basedir}/src/main/resources/config-profiles/host-specific.yml</contextFilePath>
                          </configuration>
                      </plugin>
    

    Goals

    generate-files-for-templates

    Binds by default to the generate-resources

    Parameters

    Name Type Description Required Default
    j2ResourcesDirectory String Absolute path of the directory that conatins j2 resources Yes
    outputDirectory String The absolute path of the directory where templated files are generated Yes
    contextFilePath String The absolute path of the variable file (the file should be yaml) Yes
    isLStripBlocks boolean Determine when leading spaces and tabs should be stripped. When set to yes leading spaces and tabs are stripped from the start of a line to a block. No false
    isTrimBlocks boolean Determine when newlines should be removed from blocks. When set to yes the first newline after a block is removed No true
    isFailOnUnKnownVariables boolean Fail build when a variable in template not in context No true

    Release Notes

    1.0.0 Initial release

    Release date: 22-10-2021

    Visit original content creator repository
    https://github.com/gowrish9595/jinjava-maven-plugin

  • DasEvoliBot

    DasEvoliBot

    My own discord bot different features. I originally created this bot for a friend who wanted a little fun game on his Discord server. It’s silly but was nice practice for some API and asynchron stuff.

    If you want to join this bot to your server follow this link: https://discord.com/api/oauth2/authorize?client_id=549831896759140353&permissions=190464&scope=bot

    Requirements

    • Python 3.5.3 or higher

    Setup

    • pip install discord
    • pip install requests
    • Fill data in your_settings.py and change “your_settings.py” to “settings.py”
    • Change “your_channels.json” to channels.json

    Todo April

    Fightbot:

    • Bring back immune even when positive events/specials are happening
    • Align hp, stuns and immune symbols when posting the players
    • Add that a certain amount of players get revived instead of always all. Needs a death list
    • Bring back immune even when positive events/specials are happening
    • Add that a certain amount of players getting their dodge value changed instead of always all

    Bugs

    • Currently checking if a user is online is bugged from the Discord.py API

    Other

    • Updating README.md

    Authors

    Image of DasEvoli DasEvoli (Vinzenz Wetzel)

    License

    This project is licensed under the GNU GENERAL PUBLIC LICENSE Version 3 (GPL3)

    Visit original content creator repository https://github.com/SleepyEvoli/DasEvoliBot